 @H5mag
Saved Styles
Saved Styles allow you to define a style once, and quickly apply it on multiple areas. For example if you create a section and give it a background color, padding and border you can save all these settings as a single style.
Saved Styles are shared withing a single edition, keep this in mind as changes will propagate on to other articles, artboards and popups where they are not directly visible.
Creating a Saved Style
First, create an area or section and apply some styling to it, such as changing the font. Open the styling balloon by clicking the paintbrush icon.
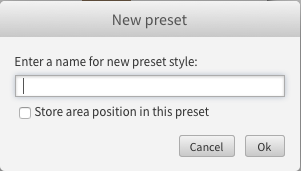
Click the Style Actions (gear) button on the right, and choose "Save style..." and enter a descriptive name. When saving you can choose to save the position. This is useful if you want to position an element on the same position on multiple articles.

Applying a Saved Style
After you have created a Saved Style you can apply it to another area or section. To apply a style open the styling balloon by clicking the paintbrush icon.
Click the dropdown menu and select the Saved Style you created earlier. The styling of the element will immediatly update to match the styles in the Saved Style.
Note: each area type has their own set of Saved Styles. You will not see the Saved Style of a Text Area in a Heading Area, and vice versa.
Overriding Saved Styles
After applying a Saved Style you are still free to change the styles. After changing a style a dotted underline will appear underneath the label to indicate that you have overridden a style.
The Saved Style Selector will also show the text " (edited)" next to it, indicating that the style no longer matches the Saved Style.
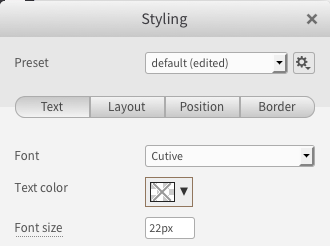
The font size overrides the default saved style. This is indicated by the the dotted line and the text "(edited)"
Copying Styles
To copy the styles from one area, first select the area. Then, click the Style Actions (gear) button and choose "Copy Styles". This action copies all the current styles, including those saved in a Saved Style, if applied. To paste copied styles to another area, select the target area and click the Style Actions button, then choose "Paste Styles". The styles will immediately be applied to the target area.
If the target area is of the same type (e.g., text to text), the Paste Styles will apply the Saved Style along with individual styles. For different area types (e.g., header to text), Paste Styles applies the copied styles as individual styles, ensuring compatibility across different types of areas.
Managing Saved Styles
Click the style actions button in the styling balloon to open a menu with the following actions:
Save style...
Updates an existing Saved Style. Any changes that you made to the styling will be added to the Saved Style and applied to all elements which have this Saved Style. This is applicable to all articles of the current edition.
Save style as...
Creates a new Saved Style, based on the current style. Enter a name for the new Saved Style. After creating it, the Saved Style will be independent from the original Saved Style.
Rename style...
Changes the name of the current style. This will not affect the styling.
Delete style
Removes the Saved Style entirely. Warning: all areas which have this Saved Style applied will lose the styling from the Saved Style. This can also include styling on other articles and artboards, which you might not see at the moment of deletion.
It is not possible to recover a Saved Style by reverting back to an earlier version of the article, since Saved Style are not stored in the article, but are part of the edition.
Always use this style for new areas
Any new areas/sections will have this Saved Style applied by default.