 @H5mag
To make visually stunning magazines you can use images. Images and other supporting files are called assets. Each article has its own collection of assets.
Supported image types
- JPEG images have the extension .jpg of .jpeg and are best suited for photos.
- PNG images have the extension .png and can be (semi-) transparent, which makes them suitable to place on top of other images. Large PNG images can become very large file sizes which makes it take longer to load the publication for your visitors. For photography: we recommend to use JPEG.
- SVG images are best used for diagrams and graphs. Older browsers like Internet Explorer 8 do not support SVG images. H5mag automatically converts SVG images to PNG images for these older browers, so you can safely use them, without having to worry about them working for everyone.
 Creating images
You can create images using any application. Many applications have an option "Save for web", which will optimize the images for display in web browsers, for example by removing color profile information from the image file.
If the colors of your images do not look right in H5mag; save them again in your image editing application, without a color profile and upload them again.
Make sure for InDesign that you export the images with an RGB profile.
Uploading images
 On the right side of the editor click the tab "Assets". You will see a list of all assets for this article. Below the list there is a "Browse..." button. After clicking on it you can select files to upload from your computer.
If you have prepared your files beforehand you can select them all and upload them all at once. Click the button "Upload assets" to start uploading. This may take some time, depending on the file size of the selected files and the speed of your internet connection. The images should then appear in the list of assets to confirm that they have been uploaded correctly.
Another way to upload an image is to select an image area you created and then click "Choose...". This opens a folder in which you can select images from your computer.
Recommend image file size and dimensions
For best results images should have a resolution of about 2 to 3 megapixels and be less than 5 MB in size. This resolution suffices for retina display. Continue reading for a more thorough explanation.
H5mag will create resized versions of images and send an optimized version to the reader's device. This means that devices with smaller/low resolution screens get a lower resolution image, which will download faster. High resolution devices will receive a high quality image which will make full use of the screen's capabilities.
As a rule of thumb, an image with the longest side of 2048 pixels will have enough detail to be displayed full screen on an iPad with a retina resolution (where individual pixels are indistuingsable by the human eye from a normal viewing distance). Higher resolutions usually do not add any perceived increase in quality but are slower and are therefore not recommended.
For small images and icons that are never displayed full screen it usually suffices to upload them at double (2x retina) the resolution than you would use on a regular (non-retina) computer screen.
The maximum supported file size is 25 MB per image. It is strongly recommended to use smaller images, as it will speed up the uploading and processing times. It should be possible for high quality images to be less than 5 MB.
After uploading H5mag will optimize PNG images using OptiPNG. This will reduce the file size without affecting the image quality (lossless).
It is not necessary to optimize PNG images before uploading since it will only speed up the uploading process slightly. There is no point in using a third party online service to optimize PNG images, as you will have to upload the images twice.
More details about images in the design guidelines
Setting a background image for your article
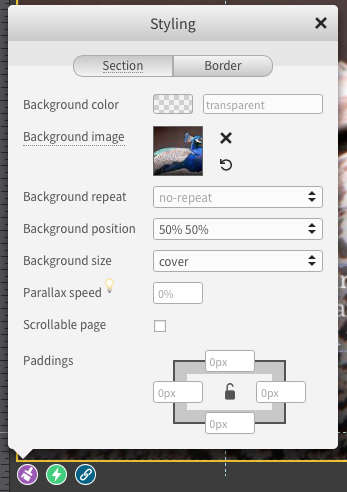 Select the section surrounding the entire article so that a yellow border appears around the article. You can do this by clicking anywhere on the artboard where there is no other content or selecting the area in the area tree.
On the left bottom corner there should be a button with a "Pencil" symbol, click it to open the styling balloon. Inside the styling balloon, click the square after the label "background image". Now a popup window called the "asset picker" appears where you can select an asset, or upload new assets. Click on the desired assets and then the "Choose" button. The image will now be used as the background image.
Using the various other settings in the balloon you can control the behavior of the background image. One of the most important things to realize is that on different devices parts on the sides of the background image may not be visible. It is highly recommended that images used on the background are checked on different devices through testing.
Images in the text area
The text area cannot just contain text, but also inline images. To insert an image first place the cursor on the desired position, and then click the "Image"  button under "Formatting".
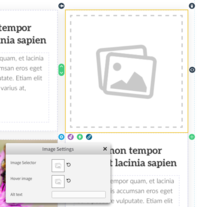
A popup window will open where you can select an asset by clicking on it. Click the "OK" button to insert it.
If you select the inline image, resize handles will appear, which you can drag to resize it. Double click the image for more options.
An image can be aligned left or right with text wrapping around it, with the "Align left" and "Align right" buttons.
Image area
 The image area is an area that contains a single image. This is the most typical way of adding an image to your content.